Galleria is a jQuery plugin that creates an image gallery. This gallery includes thumbnails and allows you to cycle through the photos.
Galleria is very easy to set up. The basic theme is free to use, but other themes cost money.
Galleria is a plugin for the JavaScript framework jQuery. You could download the library from the jQuery site. Better yet, you can use a hosted version of the library to speed up your site. Google hosts most popular JavaScript libraries.
We can include a Google hosted version of jQuery by using the following HTML in our page:
<script src="http://ajax.googleapis.com/ajax/libs/jquery/3.3.1/jquery.min.js"></script>This link includes the jQuery library on our page. Keep in mind, that this link is version specific. The URL we used above included version 3.3.1 of jQuery, which is the current version as of November 2018 (of the version 3.0 branch).
The next step is to download the Galleria files.
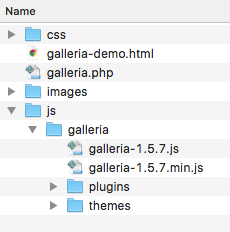
Unzip the downloaded file. Copy the entire galleria folder into your website js folder.
Once you've done this, your js folder should look something like this:
Next we need to link the Javascript file into our HTML page that we want to use Galleria on. We need links to both jQuery and the Galleria js file.
The two script tags should go just before the closing body tag of the document. The Galleria JavaScript needs to reference the jQuery framework, so you must include the jQuery file first or else it will not work.
Also note that your file names might be slightly different.
<!DOCTYPE html> <html lang="en"> <head> <meta charset="utf-8"/> <title>Galleria Example</title> </head> <body> <!-- All of your content --><script src="http://ajax.googleapis.com/ajax/libs/jquery/3.3.1/jquery.min.js"></script> <script src="js/galleria/galleria-1.5.7.min.js"></script></body> </html>
Most of the CSS for Galleria is included with the theme, which will be loaded in the JavaScript. The only thing you must style in order for Galleria to work is the height of the gallery. You may optionally specify a width. If you do not specify a width, the gallery will fill the page.
.galleria {
   height: 400px;       /* Change the height to whatever you want */
   width: 100%;         /* Optional: default is 100% */
}
You may use any class name you like for the gallery, just make sure it's the same in the HTML, CSS, and JavaScript.
The goal here is to show a thumbnail image, or group of thumbnails, and then have them link to the full size image.
In order for this to work, you must have all of your full size images ready in web format. You should then decide on a thumbnail size and prepare a thumbnail for each of your images.
You should save all of the images in your images folder.
The neat part about this kind of thing is that we don't have to do very much to our HTML in order for Galleria to work.
You can use whatever tags suit the context of your HTML. All that really matters, is that you have a thumbnail image, wrapped with a link to the full file.
You should wrap all of your images with a block element (article, section, div). Give the block element a class that you will use to reference your gallery. This must be the same class used in the CSS, HTML, and JavaScript. This example uses the class 'galleria', but you can use whatever you want.
Here's an example of a photo gallery of some paintings:
<section class="galleria">
   <a href="images/kj_cosmopolitan.jpg"><img src="images/kj_cosmopolitan-sm.jpg"></a>
   <a href="images/kj_morse.jpg"><img src="images/kj_morse-sm.jpg"></a>
   <a href="images/kj_riccar.jpg"><img src="images/kj_riccar-sm.jpg"></a>
   <a href="images/kj_sewmor.jpg"><img src="images/kj_sewmor-sm.jpg"></a>
   <a href="images/kj_spencer.jpg"><img src="images/kj_spencer-sm.jpg"></a>
</section>Galleria must be initialized after your have loaded the JavaScript files. The code below loads the classic Galleria theme and then runs Galleria.
<!DOCTYPE html> <html lang="en"> <head> <meta charset="utf-8"/> <title>Galleria Example</title> </head> <body> <!-- All of your content --> <script src="http://ajax.googleapis.com/ajax/libs/jquery/2.1.1/jquery.min.js"></script> <script src="js/galleria/galleria-1.4.2.min.js"></script><script> Galleria.loadTheme('js/galleria/themes/classic/galleria.classic.min.js'); Galleria.run('.galleria'); // Use the class name of your gallery </script></body> </html>
The text inside the parenthesis on the second highlighted line should match the class you used on your galllery. Here is is ('.galleria') because we used a class of 'galleria'. If our class was 'paintings-gallery', we would change the code to ('.paintings-gallery').
Galleria uses data-* attributes to add in titles and descriptions for each image in your Gallery. Add the appropriate attributes to your img tags.
<section class="galleria">
   <a href="images/kj_cosmopolitan.jpg"><img src="images/kj_cosmopolitan-sm.jpg" data-title="Cosmospolitan" data-description="Pen and ink painting"></a>
   <a href="images/kj_morse.jpg"><img src="images/kj_morse-sm.jpg" data-title="Morse" data-description="Pen and ink painting"></a>
   <a href="images/kj_riccar.jpg"><img src="images/kj_riccar-sm.jpg" data-title="Riccar" data-description="Pen and ink painting"></a>
   <a href="images/kj_sewmor.jpg"><img src="images/kj_sewmor-sm.jpg" data-title="Sewmor" data-description="Pen and ink painting"></a>
   <a href="images/kj_spencer.jpg"><img src="images/kj_spencer-sm.jpg" data-title="Spencer" data-description="Pen and ink painting"></a>
</section>
That's all you need for your basic Galleria implementation. Make sure to study the Galleria Demo I've provided so that you understand how to use it.
For the more adventurous folk, the Galleria documentation contains all sorts of extra features that you can use tweak things.